mail_outline sales@mediastorehouse.com
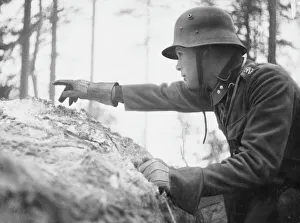
Mannerheim line WWIILieutenant Platan, an officer from Helsinki in command of this sector, points forward into no mans land, explaining Finnish strategy during World War II in Finland
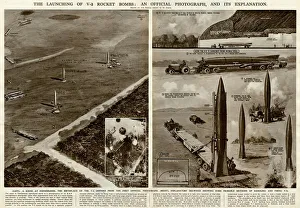
Launching of V2 rocket bombs by G. H. DavisThe launching of V2 rocket bombs during the Second World War: an official photograph and its explanation. On the left: a scene at Peenemunde, birthplace of the V2
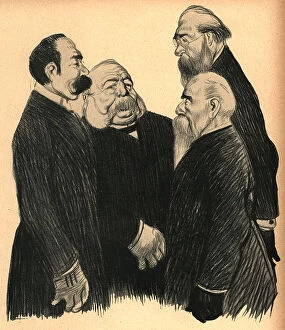
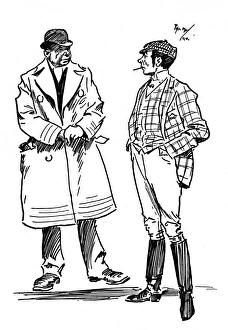
A La Suite d'un Article Signe: BoulimyThis sketch shows a group of four gentlemen interacting, visually representing the following caption, translated in English. Mr
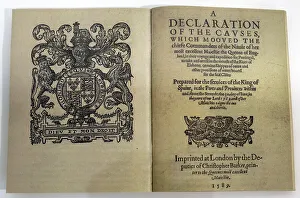
The English Armada. Statement of causes which moved the chief commanders of the Navy of Her Most Excellent Majesty the Queen of England on the Voyage and Expedition to Portugal
Comic postcard, Father and son, facts of life Date: 20th century
Comic postcard, Father and son in the garden Date: 20th century
Comic postcard, Father and son, shop window Date: 20th century
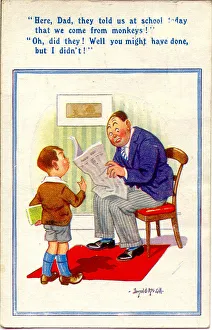
Comic postcard, Father and son discuss evolution Date: 20th century
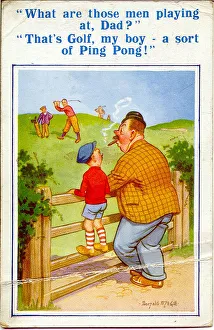
Comic postcard, Father and son watch golfers Date: 20th century
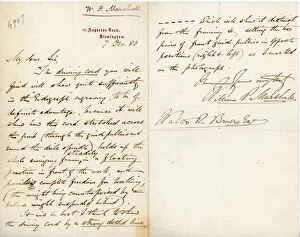
Letter from William Prime Marshall to Walter Raleigh BrowneLetter, 7 Dec 1883 from William Prime Marshall to Walter Raleigh Browne accompanying an explanation of James Watts Sculpture copying machinery (eidograph) - see BAW/14/001-2. Date: circa 1809
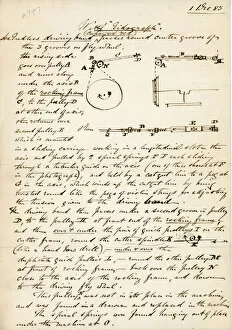
James Watts Sculpture copying machinery (eidograph)Page 1 of explanation about James Watts Sculpture copying machinery (eidograph), including a sketch of the valves (BAW/14/032) and marked-up photograph (BAW/14/003) which the the note refers to
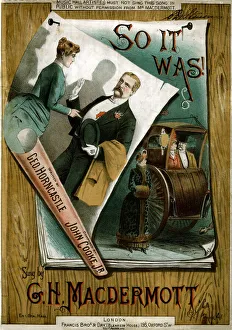
Music cover, So It Was, words by George Horncastle, music by John Cooke Junior, sung by G H MacDermott. 19th century
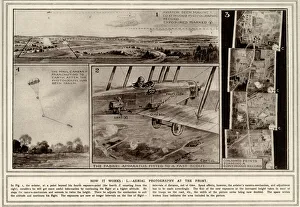
Aerial photography in World War OneA illustrated explanation of the uses of and how aerial photography worked in World War One. Aerial photography was introduced as an additional means of observation
Major Jackson, Chief of the London Fire Brigade, explaining a print to Battalion Chief, Daniel Deasy of the American Fire Brigade during World War II Date: 1939-1945
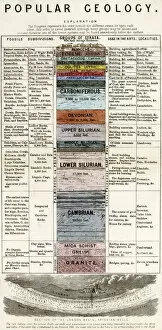
ROCK STRATA DIAGRAMA diagram giving a detailed explanation of rock strata groups, their uses and localities
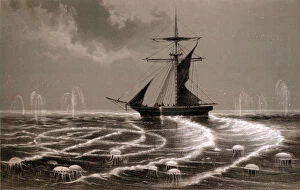
LUMINOUS WHEELSLuminous wheels have been seen from ships, especially in the Indian Ocean; often ascribed to phosphorescent sea creatures, the explanation remains unsatisfactory Date: circa 1880
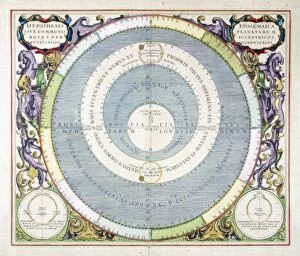
PTOLEMAIC SYSTEM /Plan of the Heavens, showing Ptolemys explanation for the eccentric movement of the Sun round the Earth, in relation to the Fixed Stars and Planets Date: 17th century
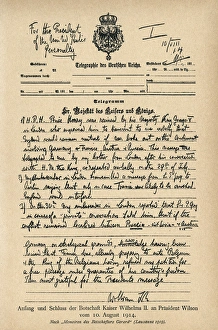
Telegram sent by Kaiser Wilhelm II to President WilsonTelegram sent by Kaiser Wilhelm II to US President Woodrow Wilson on 10th August 1914. Date: 1914
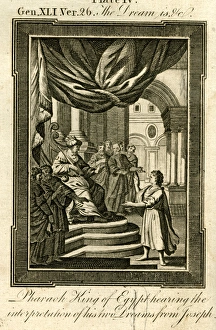
Pharaoah has his dreams interpreted by JosephPharaoah, King of Egypt, hearing the interpretation of his two dreams from Joseph - Thomas Bankes Bible, Genesis 41.26. 1787
Cartoon, Explanation, WW1Cartoon, Explanation. Three old age pensioners outside a restaurant discuss earnings and taxation. The plump man says he pays no taxes because he spends all his money on food. Date: 1916
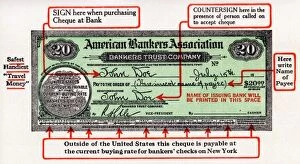
Where to write on an American Travellers ChequeExplanation of what to write and where to sign on an American Travellers Cheque. Date: 1920s
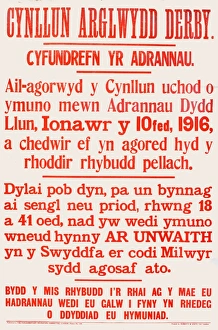
WWI Poster, Group System (Welsh version)WWI Parliamentary Recruiting Committee Poster, Group System, Enlistment in Groups will reopen on Monday January 10th 1916 and proceed until further notice (Welsh version). Date: 1916
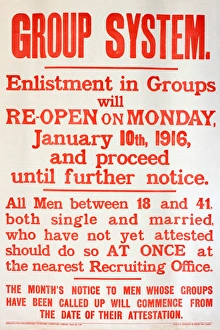
WWI Poster, Group SystemWWI Parliamentary Recruiting Committee Poster, Group System, Enlistment in Groups will reopen on Monday January 10th 1916 and proceed until further notice. Date: 1916
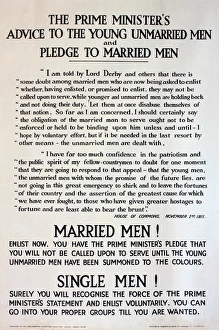
WWI Poster, The Prime Ministers AdviceWWI Parliamentary Recruiting Committee Poster, The Prime MInisters Advice to the Young Unmarried Men and Pledge to Married Men. Date: 1915
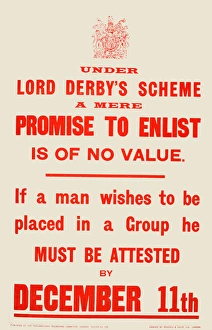
WWI Poster, Lord Derbys SchemeWWI Parliamentary Recruiting Committee Poster, Under Lord Derbys Scheme a mere Promise to Enlist is of No Value. If a man wishes to be placed in a Group he must be attested by December 11th
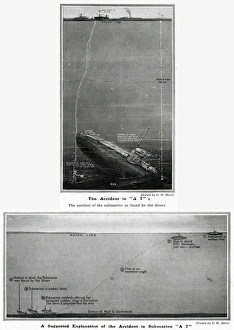
Accident to submarine A7 by G. H. DavisThe accident to the British submarine A7, embedded in soft sand and mud at the bottom of Whitsand Bay, Cornwall, with her nose raised at an angle
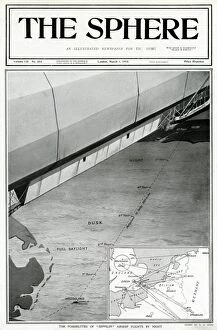
Zeppelin airship flights by night, by G. H. DavisThe possibilities of Zeppelin airship flights by night. Showing a 360 mile route from Heligoland to Selby, and an inset map with various routes marked
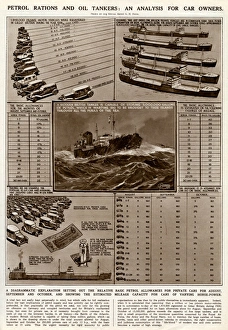
Petrol rations and oil tankers by G. H. DavisPetrol rations and oil tankers: an analysis for car owners during the Second World War. A diagrammatic explanation setting out the relative basic petrol allowances for private cars for August
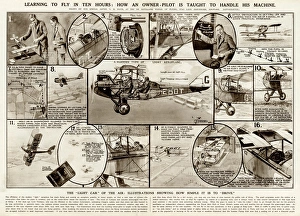
Explanation of Flying Lessons by G. H. DavisA diagram detailing how one learns to fly a light aeroplane. With the rise in popularity of owning a plane, flying lessons also became more popular. Here, the lessons are explained in detail
Horse Trainer standing up for his principlesOwner - " I heard as how you ve been fighting with Bob Smith?" " Yus. He said my sister was cross-eyed." " But you haven t got a sister?" " I know that
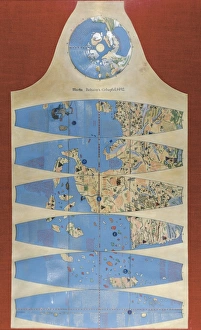
Depiction of Asia in a globe built in Nuremberg in 1492. It shows all the known territories before the discovery of America, the Equator, a Meridian, the Tropics and the twelve Zodiac Constellations
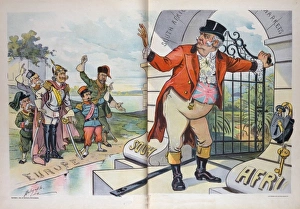
Explanation wanted. Illustration showing John Bull standing at the gate to South African markets as the rulers of Italy, Austria, Germany, France, and Russia protest. Date 1900 February 14
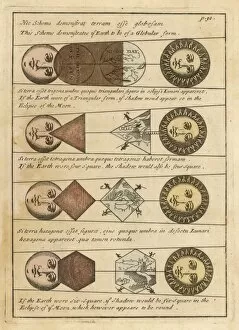
Shape of the EarthA diagram demonstrating how the Earth is definitely round due to the shadow cast across the moon and not triangular square or hexagonal in shape
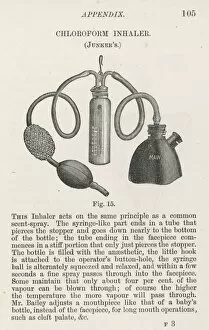
Chloroform Inhaler / 1885Diagram of Junkers chloroform inhaler with an explanation of how it works
Ptolemaic System /Plan of the Heavens, showing Ptolemys explanation for the eccentric movement of the Sun round the Earth, in relation to the Fixed Stars and Planets